You pull the dish from the oven, the kitchen smells like Sunday at your nan’s, the top looks faintly golden. You dig in… and underneath the first satisfying crunch is a layer of damp sand glued to stewed fruit. Not the shattering, buttery rubble you were promised. More like sweet porridge wearing a hat.
Most of us assume it’s the recipe, or the oven, or that we didn’t put in enough sugar. In test kitchens, home economists see something else entirely. Time after time, the same small habit is to blame for that soggy, floury lid – and the fix takes less than half a minute, just before the crumble goes into the oven.
The crumble that collapsed under the spoon
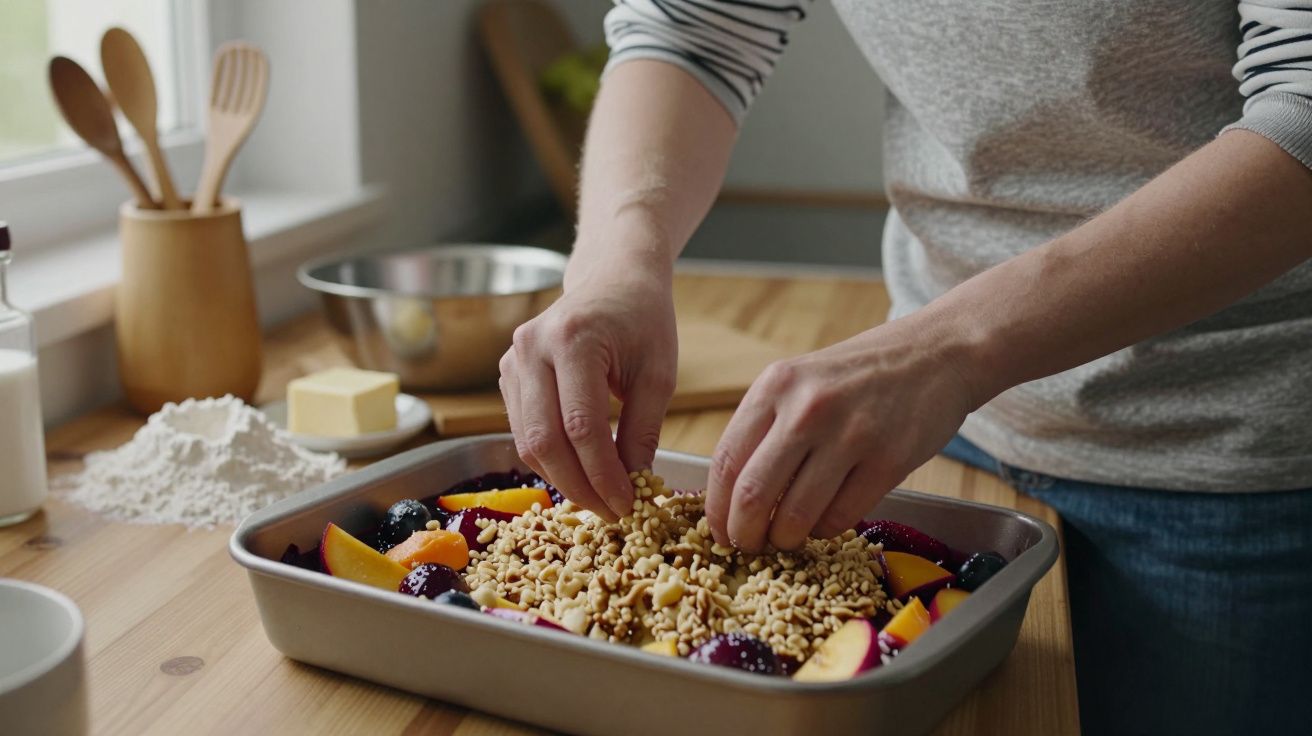
My own moment of reckoning arrived with an apple and blackberry crumble I’d bigged up far too much. The fruit was perfect, the ratio of sugar to tartness bang on. The top had colour, but not too much – the sort of thing you photograph for group chats before serving.
Then the spoon went in. Instead of shards and nubbly chunks, the topping underneath was pale, claggy and weirdly doughy. A stripe of rawish flour clung to the fruit like paste. People were kind, but you can tell when guests chew politely instead of going back for seconds.
That evening I rang a friend who works as a home economist. I was ready to blame my oven. She blamed my hands.
“You’ve turned the topping into a lid,” she said. “Next time, touch it less – and then mess it up properly right before it bakes.”
The tiny mistake: turning your crumble into a lid
The classic home‑cook move is this: you make a decent crumble mixture, tip it over the fruit, then gently pat or smooth it into place so every last bit of fruit is covered. Maybe you even press it down a little, to make it neat. It feels instinctively right, like tucking a bed in.
In crumble terms, it’s a disaster.
When you press the topping flat, you compact the flour, sugar and butter together. Those loose crumbs weld into a soft biscuit layer. As the fruit underneath bubbles, steam pushes up and hits that solid cap. With nowhere to escape, it condenses and soaks back into the topping instead of drying it out.
The result is exactly what you’ve seen a hundred times: a crumble that looks fine on top, but turns into soggy rubble where it meets the fruit. Not underbaked, not burnt – just wet, heavy and slightly raw‑tasting.
A proper crumble topping is not a lid. It’s a pile of rubble with air running through it.
Why a looser topping stays crisp
Home economists talk about “structure” even in something as simple as crumble. You don’t just want sweetness and butter; you want little bits of architecture.
When the topping is scattered on loosely:
- There are tiny gaps and tunnels for steam to escape.
- The butter can melt and fry the flour and oats around it, giving you toasty, nutty flavour.
- The heat can move through the crumbs, drying them out so they snap instead of slump.
Pack it down and you lose all three. The topping steams, the flour in the middle never really cooks, and any crunch you get is a thin crust on the very top that gives way to mush.
This is why the same recipe can behave so differently from one kitchen to the next. Two people weigh the same ingredients and bake for the same time. One gets a crisp, golden crumble. The other gets beige breadcrumb sludge. The difference is that last 30 seconds with their hands.
The 30‑second fix home economists swear by
In test kitchens, no crumble goes into the oven without a final “roughing up”. It looks almost careless. In practice, it’s the single quickest way to turn a potential lid into actual crumble.
Here’s the move:
Scatter, don’t spread
When your topping mixture is ready, don’t tip it in one heap and push it about. Take handfuls and sprinkle them from a little height over the fruit, so they fall in a light, uneven layer.Ruffle the surface
Once the dish is covered, set a timer for 30 seconds in your head. Using just your fingertips (or a fork, if you prefer), lightly lift and drop small clumps of topping all over the surface. You’re aiming to:- break up any obvious flat patches
- create little peaks and valleys
- open up tiny cracks where you can glimpse the fruit
- break up any obvious flat patches
Intentionally leave some “bald spots”
This feels wrong, but it works. Let pinpricks of fruit show through here and there. Those hotter spots help steam escape and give you deep, caramelised edges around the fruit bubbles.
That’s it. No new ingredients, no chilling, no extra kit. Just 30 seconds of gentle sabotaging so your topping can’t form a solid sheet.
What if the crumble is already in the oven?
If you peek in and see the top looking suspiciously flat and damp, you still have a chance:
- Slide the dish out onto a heatproof surface.
- Using a fork, very quickly rake and fluff the surface – just enough to crack the crust and lift it in a few places.
- Move the dish up one shelf (for more direct heat) and finish baking.
It’s not quite as effective as doing it from the start, but it’s often enough to rescue the texture.
Common crumble mistakes that secretly add to the sogginess
The “lid effect” is the main villain, but a few other habits quietly make things worse. They’re easy to tweak.
1. Starting with warm, soft butter
Warm butter rubs in too quickly and too evenly, so you end up closer to pastry than crumble. The topping bakes into a soft, bready layer rather than crisp crumbs.
- Use fridge‑cold butter, cut into small cubes.
- Stop rubbing in as soon as you have a mixture that looks like coarse breadcrumbs with some small pebbles. If it starts clumping into a ball, you’ve gone too far.
2. Drowning the fruit with no “sponge” underneath
Very juicy fruit (plums, berries, rhubarb) throws out a lot of liquid. If there’s no buffer, that juice can flood the base of the topping and turn it into paste.
A 10‑second insurance policy: before you add the crumble, sprinkle one of the following over the fruit:
- 1–2 tbsp cornflour or plain flour
- 2–3 tbsp ground almonds or semolina
- A small handful of fine breadcrumbs
They thicken the juices as they bubble, instead of letting them soak straight into your carefully ruffled crumbs.
3. Using a dish that’s too deep
Very deep crumbles mean the fruit takes longer to heat and start bubbling. While you wait, the topping sits over a warm, damp layer of air – exactly when it’s most vulnerable to turning claggy.
Shallower is better:
- Aim for a dish where the fruit comes about halfway up the side, and the crumble adds another 1–2cm on top.
- If in doubt, split one big crumble between two smaller dishes. You’ll get more pleasing edge bits too.
At‑a‑glance: small changes, big difference
| Habit most of us have | What home economists do instead |
|---|---|
| Tip topping on and pat it flat | Sprinkle from a height, then ruffle and “rough up” the surface |
| Cover every last bit of fruit | Leave tiny flecks of fruit showing as steam vents |
| Use any oven shelf with space | Bake crumbles on the upper‑middle shelf for better browning |
| Blame the recipe when it’s soggy | Adjust handling and dish depth before changing ingredients |
A simple step‑by‑step for reliably crisp crumble
If you like a clear sequence, here’s the version home economists teach in workshops:
Prep the fruit
Toss with sugar and (if very juicy) a spoonful of flour or cornflour. Tip into a not‑too‑deep dish.Make the topping
Rub cold butter into flour and sugar until you have a rough, gravelly mix. Stir in oats or nuts if using. Stop before it turns into a dough.Scatter lightly
Take handfuls of topping and let them fall over the fruit. No pressing, no smoothing.Do the 30‑second ruffle
Lift and drop small clumps, create peaks, open up a few gaps. Aim for an uneven, almost scruffy surface.Bake high and hot enough
Pop on the upper‑middle shelf of a properly preheated oven. Bake until:- the fruit is clearly bubbling at the edges, and
- the topping is well‑browned in spots, not just faintly beige.
- the fruit is clearly bubbling at the edges, and
Rest briefly before serving
Five to ten minutes out of the oven lets the juices thicken and the topping firm, instead of collapsing under the first spoon.
FAQ:
- Do I really have to leave bits of fruit showing?
It helps more than you’d think. Tiny exposed patches give steam an escape route and encourage caramelised, jammy edges. You’re not aiming for big bald areas, just little flecks.- My topping keeps clumping into big lumps – is that bad?
A mix of sizes is good; golf‑ball chunks are not. If you see very big clumps, simply crumble them between your fingers as you scatter, then do the 30‑second ruffle.- Can I make the topping in advance?
Yes. Keep it in the fridge for up to two days, or freeze it. Sprinkle it from frozen straight onto the fruit, then ruffle. Cold crumbs actually brown very nicely.- How do I rescue a crumble that’s already soggy?
You can’t make it perfect, but you can improve it: rake the top with a fork, sprinkle over a spoonful of demerara sugar, move it to a higher shelf and give it another 10–15 minutes.- Does this trick work for savoury crumbles (like vegetable or fish)?
It does. The same rule applies: don’t press the topping into a lid. Scatter, ruffle, leave vents for steam, and bake hot enough for proper colour.
Next time you’re about to smooth the top of a crumble, pause. Give it that deliberately scruffy 30 seconds instead. The difference between a lid and a proper crumble is literally at your fingertips.


Comments
No comments yet. Be the first to comment!
Leave a Comment