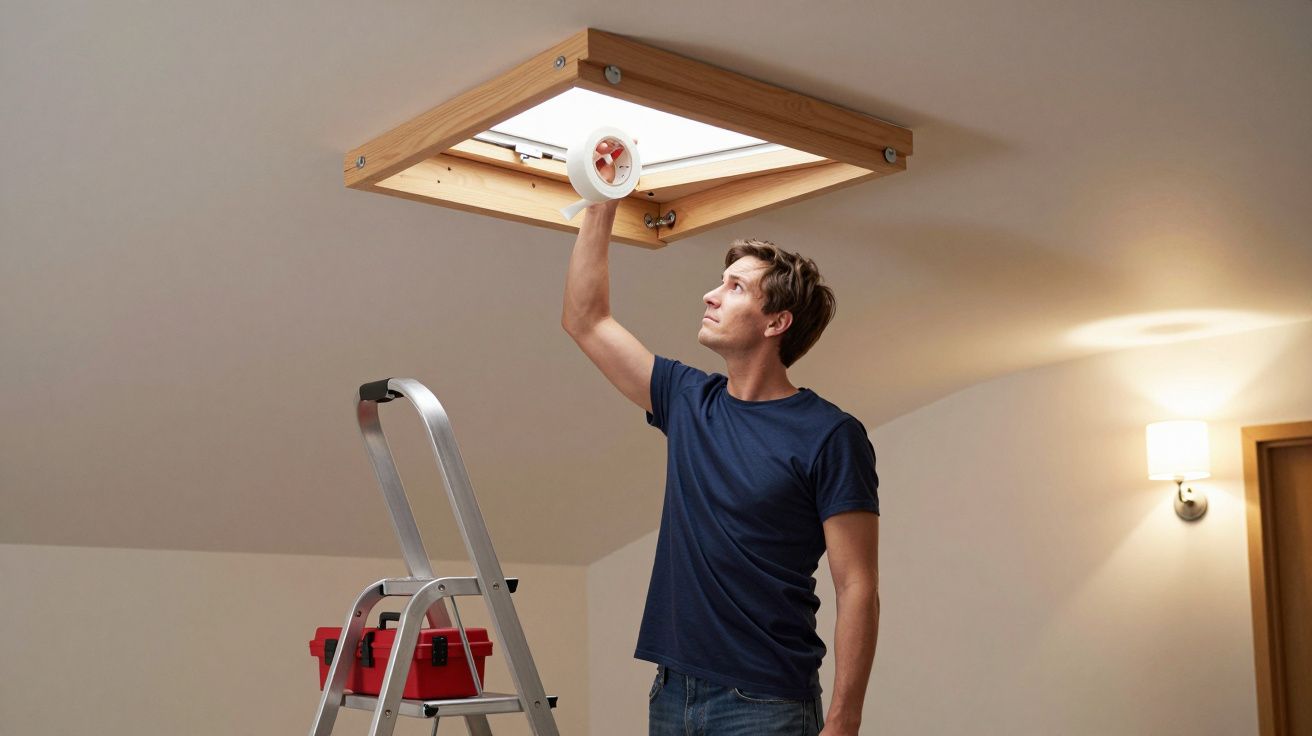
The loft hatch was the first thing I noticed on the cold snap night - not the windows, not the back door. I stood on the landing in socks, heating on, and the air felt fine until I walked beneath that square of timber and got a little shiver on the scalp, like the house had a hidden draught machine.
I did what most of us do: blamed the boiler, then the radiators, then the Victorian “character”. But the giveaway was my hand. Hold it near the hatch edge and you can feel a faint, steady slip of warm air heading up into the loft, paying to heat a space you don’t live in.
An insulation installer I spoke to put it bluntly: if your loft hatch isn’t sealed, it’s basically a letterbox in the ceiling. The fix isn’t glamorous. It is, however, about a £6 roll of self-adhesive foam tape - and it can be done in under 20 minutes if the hatch is in decent nick.
Why the loft hatch feels icy (even with the heating on)
Warm air rises. That’s not a fun fact; it’s the whole plot. Your landing and upstairs hallway are where heat pools, which means the hatch is sitting at the top of a warm column while the loft above is often close to outside temperature.
If there’s even a millimetre or two of gap around the hatch, the “stack effect” helps push warm air up and pull cooler air down. You don’t always feel it as a gust; it’s more like a constant, quiet leak that makes the area under the hatch feel oddly chilly and the loft feel oddly… sponsored.
“We see it all the time: people add more loft insulation but leave the hatch like a loose lid. Seal the hatch and the upstairs stops feeling ‘hollow’,” says Dan, a domestic insulation installer in Leeds.
The £6 foam‑tape seal: what it is (and why it works)
The simplest version is closed-cell self-adhesive foam strip - the same family of draught-proofing you’d use around a door, but sized for a hatch. It compresses when the hatch shuts, filling the tiny air paths that let heat escape.
Closed-cell matters because it’s less sponge-like. It won’t soak up moisture from loft air as readily, and it holds its shape better over time than very soft, open foam. You’re not “insulating” the hatch so much as stopping convection: the movement of warm air through gaps.
There are two common outcomes once it’s on:
- The hatch stops feeling like a cold radiator above your head.
- The upstairs holds heat longer, so the heating cycles less aggressively in the evening.
How to fit it in under 20 minutes (installer method)
You don’t need a toolkit parade. You need a clean surface, a decent tape, and a little patience so the adhesive actually sticks.
What you’ll need
- Self-adhesive closed-cell foam tape (typically 9–12mm wide, 3–6mm thick)
- Scissors or a sharp knife
- Cloth + mild cleaner (or isopropyl alcohol for a final wipe)
- Step ladder
- Pencil (optional, for marking corners)
Step-by-step
- Open the hatch and check the “contact line”. You want the tape where the hatch meets the frame when shut, not on the swinging side where it will snag.
- Clean the frame. Dusty paint and loft grit are adhesive killers. Wipe, then dry fully. If it feels chalky, do a final wipe with alcohol.
- Apply tape around the frame (not the hatch) in one continuous run if you can. Start on a straight edge, press firmly as you go, and don’t stretch the foam - stretched tape shrinks back.
- Treat corners like corners. Either miter the ends (neat 45° cuts) or butt-join carefully. Gaps at corners are where leaks love to hide.
- Close the hatch gently and test compression. It should shut without forcing, but you should feel a slight resistance. If it won’t close, the tape is too thick.
- Do the “hand test”. With the heating on, hover your hand around the perimeter. You’re looking for the absence of that faint warm slip.
A quiet tip from installers: if your hatch has twist catches, tighten them a touch after fitting so the seal compresses evenly. If it’s just a lift-out board, consider adding two simple turn-buttons so it can press down onto the tape rather than sit there loosely like a tray lid.
The common mistakes that make people think it “doesn’t work”
Most failures aren’t the tape’s fault; they’re the setup.
- Sticking tape onto dusty loft-frame paint. It peels within days and you’re back to square one.
- Using very soft, fat foam. It feels plush but stops the hatch closing properly, so people rip it off.
- Sealing the wrong surface. Putting tape on the hatch edge can tear it up every time you lift it.
- Ignoring the hatch itself. If the hatch is thin MDF and feels icy to the touch, you may need a bit of insulation on the hatch panel too (more on that below).
What if the hatch is still cold to touch?
Sealing stops warm air leaving, but it doesn’t magically make a flimsy hatch warm. If the hatch panel is uninsulated and the loft is freezing, the hatch becomes a cold surface above your head - like touching a chilled biscuit tin.
Installers often do a simple add-on: a piece of PIR insulation board (Celotex/Kingspan type) cut to size and fixed to the loft side of the hatch with adhesive, keeping it clear of hinges and catches. If you do this, keep the insulation thickness sensible so the hatch still closes, and don’t block any loft ventilation paths.
If you want the quickest win for the least fuss, though, the foam seal is the one that changes the feel of the landing fast. It stops your heated air from disappearing upwards and turning the hatch area into a weird microclimate.
| Fix | Cost ballpark | What it solves |
|---|---|---|
| Foam tape seal around frame | ~£6–£12 | Warm air leakage into loft, draughty “cold spot” under hatch |
| Turn-buttons / latches | ~£3–£10 | Loose lift-out hatches that don’t compress the seal |
| PIR board on hatch (loft side) | ~£10–£25 | Hatch panel itself feeling cold to touch |
A small ceiling fix that makes the upstairs feel “finished”
There’s something maddening about paying to heat a home and then feeling a cold patch right where the warmth should be lingering. Sealing the loft hatch is one of those jobs that sounds too small to matter, right up until you do it and the landing stops feeling like a thoroughfare for heat.
You’ll still need decent loft insulation, and you’ll still have cold days. But for the price of a takeaway coffee and the time it takes to put the kettle on and forget about it, you can stop one of the most common warm-air escape routes in the house.
FAQ:
- Is foam tape safe to use around a loft hatch? Yes, as long as it doesn’t interfere with safe access or any electrical fittings. Use closed-cell tape and keep it tidy so the hatch still sits flat.
- What thickness of foam tape should I buy? For many hatches, 3–5mm thickness works well. If your hatch is very uneven you may need thicker, but too thick can stop it closing.
- Should I seal the hatch if I have loft ventilation? Yes - sealing the hatch is about stopping air movement between the heated home and the cold loft. It shouldn’t block soffit or ridge vents; don’t tape over ventilation openings.
- My hatch is a loose lift-out board. Will tape still help? It can, but it works best if the hatch is held down with turn-buttons, clips, or a latch so it compresses the foam evenly.
- Will this stop condensation in the loft? It can help by reducing warm, moist household air leaking into the loft, but condensation has multiple causes. Ensure loft ventilation and bathroom/kitchen extraction are working properly.


Comments
No comments yet. Be the first to comment!
Leave a Comment