The noise always seems louder at night.
You’ve made a cup of tea, the house is finally quiet, and you nudge the kitchen cupboard shut with your hip. Instead of a polite little click, it gives you that sharp, hollow bang that seems to rattle straight up the back of your neck. You wince, automatically check you haven’t woken anyone, and tell yourself, again, that you’ll “sort those doors” one weekend.
New hinges. Stick-on rubber dots. Something.
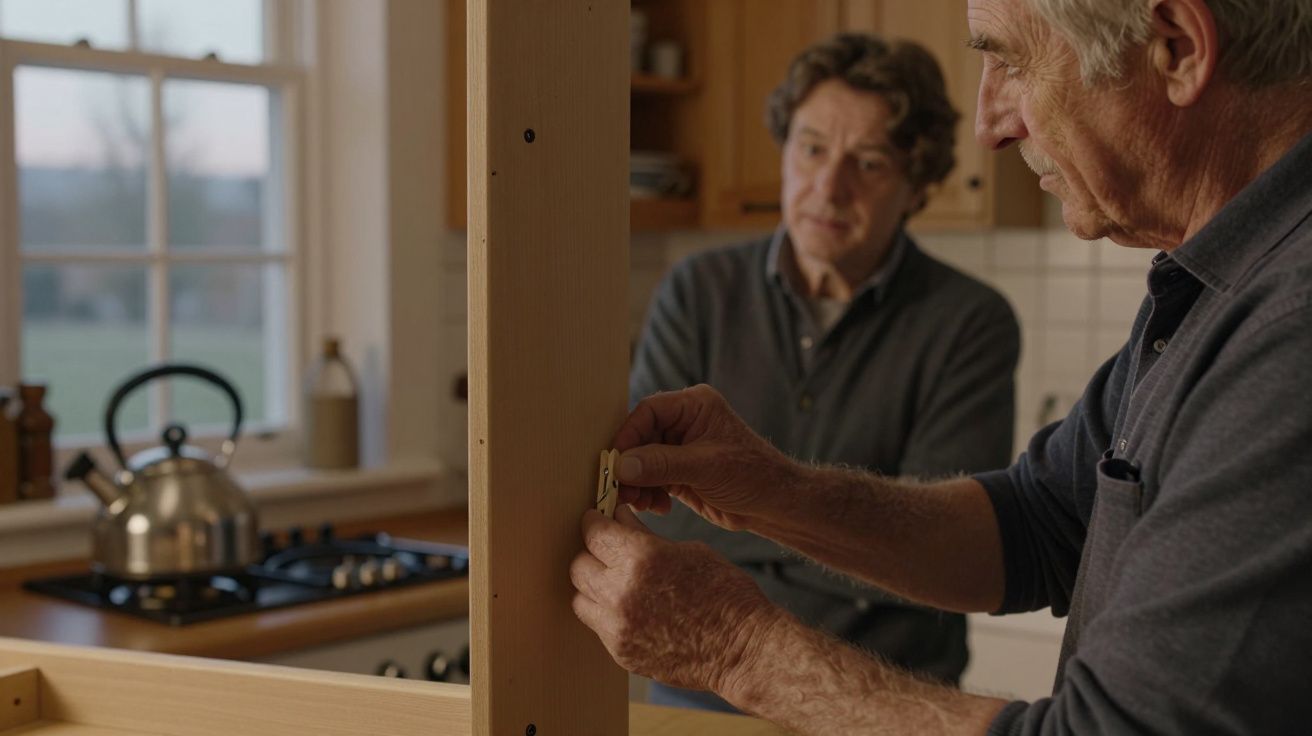
Then one day a retired joiner comes round to fit a curtain pole, notices you flinching at the cupboard door, and does that slow, amused half-smile.
“You don’t need all that plastic nonsense,” he says, fishing in his pocket. “You just need a peg.”
He’s not joking.
Why banging cupboard doors bother you more than you think
A cupboard door slamming is tiny, objectively. But your nervous system doesn’t measure “tiny”; it measures “sudden”. That little burst of sound, especially in an otherwise quiet room, is enough to jolt you out of whatever calm you’d managed to build.
It’s also a reminder, every single time, that something in the house isn’t quite right. The hinges are fine, the door shuts, but the experience is slightly aggressive. Instead of the kitchen feeling finished and looked after, it feels a bit unfinished round the edges.
There’s a practical side as well. Repeated impact slowly bruises paint, chips corners and loosens screws. Over the years, that crisp vertical gap line between door and frame starts to look chewed. The noise you dislike is the same energy that’s quietly wearing the cupboard out.
So you go hunting for a fix. Soft-close hinges look tempting, until you realise they mean taking every door off and spending a small fortune. The obvious cheap solution - those stick-on silicone buffers - works, but they can look like exactly what they are: little warts dotted around your kitchen.
The retired joiner in the corner just raises an eyebrow, then reaches for a wooden clothes peg.
The peg trick, in his own words
He’s been hanging doors since the 1970s. Schools, banks, endless kitchens in houses that all blur into one long lino floor. On sites, problems had to be solved with whatever was in the van, not a trip to a fancy fittings shop.
“We’d get called back because some cupboard in the staffroom was clacking shut and driving everyone mad,” he remembers. “You weren’t going to rip the hinges out for that. You’d grab a peg, make a little stop, job done.”
The principle is beautifully simple:
- A traditional wooden clothes peg is just two tapered bits of beech.
- That tapered shape, trimmed and fixed in the right place, becomes a near-invisible, springy stop.
- Instead of door edge hitting carcass flat-on, it comes to rest against that gentle wedge of wood.
- The contact is earlier, softer and spread over a slightly flexible surface, so you get a muted “thunk” instead of a sharp “bang”.
No big plastic buffers, nothing visible from the front. Just a sliver of honest timber, hiding where only you know it’s there.
He shows you in the time it takes the kettle to boil. A quiet ritual he’s repeated in hundreds of rooms, now casually passed on over the kitchen table.
How to do the peg trick on your own cupboards
You don’t need specialist tools or a workshop. If you can use a small saw and shut a door gently, you can do this.
What you’ll need
- 1–2 traditional wooden clothes pegs (the spring type you can pull apart)
- A small hand saw or junior hacksaw
- A bit of sandpaper or a nail file
- PVA wood glue or strong double-sided tape
- A pencil
- Optional: one small screw if you want a fully mechanical fixing inside a solid carcass
Step 1: Check the hinge basics
Before you start, make sure the door is roughly aligned.
Open and close it slowly. The gap round the door should be fairly even, and it shouldn’t be scraping anywhere. If the hinges are obviously loose or the door is badly twisted, those need attention first. The peg trick is for softening the close, not hiding major wonk.
Step 2: Take your peg apart
Hold the peg over a tray or the sink, squeeze, and slip out the spring. You’re left with two identical wooden halves, each with a gentle taper and one flattish side.
Pick the half that sits flattest on the inside of your cupboard frame. That flat face is what will glue down; the sloped, tapered side will become the contact point.
If the piece is quite long, you can saw it in half so you end up with two shorter wedges - one for near the top hinge, one for near the bottom.
Step 3: Find the sweet spot where the door lands
This is the only moment you need to slow down and pay attention.
- Take a narrow strip of paper and lay it along the inside front edge of the cupboard frame, close to the hinge side.
- Gently shut the door on the paper and see where it grips or creases. That’s roughly where the door edge makes contact as it closes.
- Open again and put a small pencil mark on the carcass at that point.
You’re aiming to position the peg piece so the door meets it in the last centimetre or so of travel, turning a hard stop into a cushioned one.
Step 4: Offer up the peg and test
Hold your peg half against the inside edge of the frame, flat face against the carcass, tapered side pointing towards where the door edge will come.
Slide it up or down until it sits just below your pencil mark, then very lightly close the door by hand. Don’t slam - you’re checking fit, not testing a fire door.
- If the door won’t close fully, your peg piece is too proud. Either move it a fraction deeper inside the cupboard, or shave a sliver off with the saw and sand the end smooth.
- If the door closes and the noise has already softened, you’re in the right zone.
The joiner’s tip is to err on the side of too gentle. “You want it so the door still shuts happily on its own,” he says, “but it doesn’t throw itself at the frame like it’s in a mood.”
Step 5: Fix it in place
Once you’re happy with the position:
- Put a thin smear of PVA on the flat face of the peg, or apply a square of strong double-sided tape.
- Press it firmly onto the inside of the frame where you tested it.
- Hold for 20–30 seconds; if using glue, wedge the door just ajar with something (a tea towel will do) while it’s drying so it doesn’t push the peg out of place.
On solid timber carcasses, old-school joiners sometimes drill a tiny pilot hole through the peg and add a brass screw for ever-and-ever security. For most modern chipboard cupboards, glue or tape is more than enough.
Repeat near the bottom hinge with your second peg wedge if you want a really balanced, even close.
Step 6: Live with it for a day
Use the cupboard as normal. Notice the difference.
Instead of that hollow clap, you get a subdued knock as the tapered wood catches the door and slows it. Over a day or two, you’ll stop bracing for the bang; your hand will naturally push a touch more gently, your shoulders will drop.
If it still feels a bit firm after a while, you can carefully pop the peg piece off, sand a whisper more from the end and refit. Tiny adjustments, big change.
Soyons honnêtes : personne ne démonte toute sa cuisine juste pour des charnières à fermeture douce.
This takes ten minutes and costs less than a packet of biscuits.
Little variations that make the trick even neater
Every kitchen is a bit different, but the same idea stretches surprisingly far.
- Glazed or display cupboards: Fix the peg pieces behind the mullions or in the upper corners so they’re hidden from most angles.
- Wardrobes and big larder units: Use slightly longer peg halves and position them higher up, where the door has more travel and more weight.
- Drawers: A trimmed peg piece fixed to the inside back of the cabinet can act as a soft stop so drawers don’t slam into the carcass.
- Rented homes: Rely on good-quality removable tape rather than glue. When you leave, you can ease the wedges off and clean any residue with a bit of warm soapy water.
The joiner also keeps short lengths of beech dowel in his toolbox. For very minimal cupboards, he’ll drill a shallow angled hole and glue in a dowel stub instead of a peg piece. Same principle, even tidier look. But for most of us, the humble clothes peg is easier, cheaper and already in the laundry basket.
Why this old-fashioned hack feels oddly satisfying
There’s something pleasingly quiet about solving a daily irritation with a scrap of wood instead of buying a new system.
You’re not adding a visible gadget; you’re tweaking how the cupboard behaves from the inside. No one walking into the kitchen will know why it suddenly sounds calmer. You will, though, every time your fingers brush that smooth peg edge while you reach for cereal.
It’s also a small act of respect for the cupboards you already have. Rather than labelling them “annoying” and daydreaming about ripping them out, you accept them, adjust them, make them kinder to live with.
“We were taught to leave things better than we found them,” the joiner shrugs. “Sometimes that’s a big staircase. Sometimes it’s a daft door that stops shouting at you.”
Those tiny acts add up. A quieter close here, a softer lightbulb there, a shelf that doesn’t wobble anymore. They’re not Instagram moments, but they are what make four walls feel like a home instead of just a box you sleep in.
| Key idea | Detail | Why it matters |
|---|---|---|
| Use a wooden peg as a hidden stop | Trimmed peg half fixed inside the frame, tapered side to the door | Softens the close without visible plastic buffers |
| Place it where the door just meets | Test slowly, then glue/tape in the “last centimetre” of travel | Cuts the sharp bang while keeping an easy shut |
| Tweak, don’t replace | Works with existing hinges and carcasses | Saves money, avoids waste, and respects the original joinery |
FAQ:
- Will this work on any cupboard door? It works best on standard hinged cupboard doors that close against a frame or carcass front. Ultra-flush handleless systems and push-to-open mechanisms are more sensitive and may need purpose-made soft-close fittings instead.
- Won’t the peg eventually break or come off? A solid wooden peg half, lightly glued, stands up well to everyday use because it spreads the impact. If it ever does come loose, you can simply reglue or replace it in a few minutes.
- Does the peg have to be wooden? Yes. Plastic pegs are too smooth and brittle; they don’t glue as well, and they don’t absorb impact in the same way. Traditional beech or similar hardwood pegs are ideal.
- Will it damage or mark the door? If positioned correctly, the door edge will meet the sloped peg surface gently, not crash into it. Over time you may see a faint polished spot on the paint where they touch, but it’s usually far less visible than chipped corners from constant banging.
- What if my doors are already fitted with soft-close hinges? If the hinges are designed to be soft-close but still slam, they may need adjusting or replacing. The peg trick is mainly for ordinary hinges; adding it on top of soft-close hardware can sometimes interfere with the mechanism.

Comments
No comments yet. Be the first to comment!
Leave a Comment